At times like this, when I am feeling quite overwhelmed and submerged, I like to break all the things I want to tick off my list into smaller, more manageable tasks. I give myself time frames in which to get things done. Like today, for example, I have the day off work and so I will spend the morning working on this here blog, making food and doing some cooking to get ready for the week ahead. By 12 noon, I will start my painting and work on that until 5 pm. From 5 pm, I will practice my drums and do my cardiac homework. I like to write all of these things down so that if I think of anything else that I need to do it's all there in front of me, instead of swimming in my head causing mini whirlwinds of frustration.
Breaking everything I need to do into a timetable helps me work towards a deadline. As it approaches 12, I will have in the back of my mind that I need to get this done, and I will hurry my arse along to make sure that it happens.
I don't know about you, but if I don't have a deadline, I kind of just meander about, doing little things here and there. I start one thing and then get distracted halfway through by something else that I find needs to be done.
By setting myself goals and a deadline, I can stay focused and get the shit sorted.
And now to tell you about sprouts.
Sprouts remind me of being a child. At one point, my mum worked in a fruit and veggie shop and I used to go along with her and hang around whilst they set up the shop before I went to school in the mornings. They often had little, interesting items for sale. One of these interesting items was an alfalfa sprouter. A handful of seeds came in a small container and each day I would water them and watch them grow. It was pure magic. I often took them to school with me and we would grow them as a class project.
A friend of mine gave me a fancy seed sprouter for Christmas and it's so much fun to watch these little seeds come to life.
There are many health benefits in regards to sprouting seeds. They are fresh and full of vitamins and minerals but I think the main thing for me in regards to growing sprouts is that they are there in my cupboard, fridge or on my windowsill as I need them, ready to throw in my salad and get in my belly.
One good thing about sprouts is that you can sprout anything that comes in seed form. Make sure that the seeds haven't been sprayed with nasty chemicals though. You want nice, healthy baby plants to make you nice and healthy.
It only takes literally 5 minutes a day and you have a fresh, healthy snack with the added bonus of knowing exactly how it was grown.
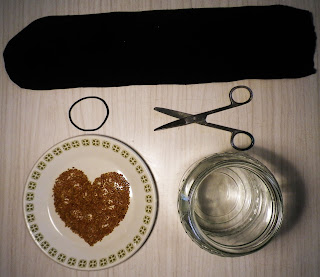
What you need:
- Either one seed sprouter and these can be bought online or from any good health food shop. Follow the instructions.
- One clean jar.
- A tablespoon full of seeds. Alfalfa is a good one to start with.
- A rubber band.
- An old stocking.
- A pair of scissors.
- A cup of water.
Method:
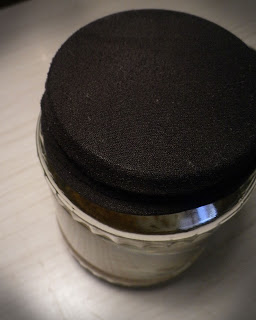
Place the seeds in the jar. Cut the foot off of the stocking and place over the jar as shown in the photo.
Secure the stocking in place with the elastic band.
Pour the water in the jar and let stand in a cupboard overnight.
The next morning, rinse the water out of the jar. The stocking will act as a sieve so you can rinse the water without loosing any of the seeds. You want to leave the seeds moist but not have them drowning.
Rinse the seeds morning and night over the next few days until they have grown to a substantial size. This may take 4 days to a week.
Once this has happened, give them a good rinse and place them in an airtight container in the fridge.
They should last about a week in the fridge.
Add them to whatever you like: salads, a topping for soups and casseroles, into curries. Let your imagination run free! This is a really easy project that the kids will love. x


No comments:
Post a Comment